This is an old revision of the document!
Table of Contents
Jitsi Videoconferencing
A Jitsi instance for videoconferencing is available at jitsi.physik.fu-berlin.de. There is no need to install any software or create an account and it works directly in the browser, but clients for Android and iOS and the Desktop exist as well.
First Steps
When you go to jitsi.physik.fu-berlin.de by the landing page. Videosessions can be started by pressing the Button labelled Go, which will use randomly created name for conference room in the field to the left, but you can also enter any other name for your meeting in the field. The random names are generated by choosing words from a dictionary, so that the meeting name can be easily communicated verbally. You can also directly enter a meeting via the name, by appending it to the URL, e.g. for the example VastCelebrationsScrewLongTerm the URL would be jitsi.physik.fu-berlin.de/VastCelebrationsScrewLongTerm.

When you first use our Jitsi instance, you will be asked to choose a name for yourself that others can see, you can change it at any time later.
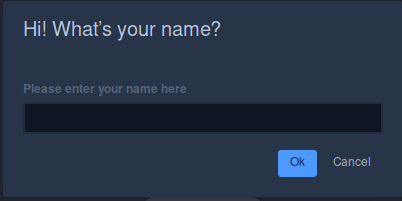 The name will be saved in a cookie, so that you don't have to enter it again the next time over.
After having chosen a name, you will enter the room and if you haven't used our Jitsi instance previously and made permanent settings be asked by your browser whether to allow the page to use the microphone and camera.

By default the current speaker will be shown large and all the other participants on the side.
Using Jitsi
In this section we will explain all the buttons and settings that you have

The box on the top tells you the meeting name and for how long it has been going.
The area on the right side shows all the participants in the meeting and the circle next to it shows your current broadcasting quality. Its values are Aud (audio only), LD (low definition), SD (standard definition), and HD (high definition).
The central buttons are (1) mute microphone toggle, (2) end call, and (3) video mute toggle. In the above example the microphone is running (the button has a white background) and the video is off (the button has a dark background). Via the small arrows on the right side of (1) and (3) you can choose their source if you have multiple microphones or cameras.
The buttons on the left are (4) open chat window, (5) share desktop, and, (6) raise hand.
When you press (5) you will be again asked for permission, whether you want to allow the page to share your desktop and depending on your browser you will be asked to choose a window, the entire desktop or tab that you want to share. By pressing (3) you can also show your camera feed in addition to what you share.
Pressing (8) signals to the other participants via a small popup that you would like to speak.
Pressing (4) opens a chat window for a general chat between all participants. You can send private messages to a mouseover menu on the other participants windows in the user list or the tiled view and they will appear in the same chat window in a different colour.
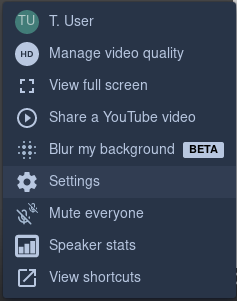
The buttons on the right are (7) tiled view, (8) invite people, (9) security options (encryption and password settings), and (10) more settings.
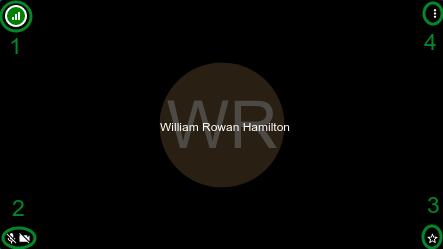
Pressing (7) changes to the tiled meeting view, where you can see all participants at the same time (including yourself). This is a good time to explain the status icons on participants' windows. (1) is the connection quality, (2) show whether they are audio or video muted (in this example both), (3) is the moderator star, and (4) is a menu with options to interact with the user directly. If you are not a moderator the (4) allows you to direct message that user, and adjust a volume bar which controls how loud you hear that specific person. If you are the moderator you have many more rights, including muting other participants, granting them moderator rights, and being able to remove them from the room. The first person to enter a room is the moderator.
Menu (5) shows informations about the current meeting, including an invite link and the password to enter the room, if one is set. Here you can also change the room password.
The three buttons (6) on the very right give you this menu with various options, e.g. blurring your background (still experimental), changing your video quality, showing hotkeys and the settings.
The settings allow you to change your audio and video sources…
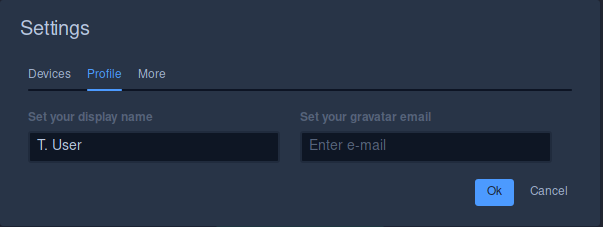
 …your name…
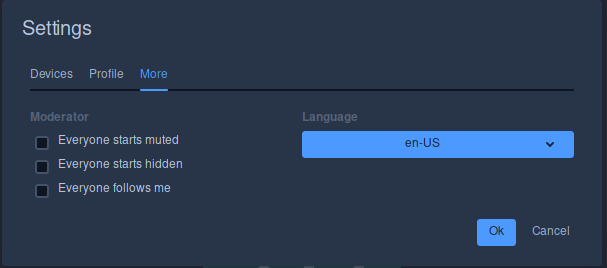 …and set advanced options on the meeting, like forcing everyone to start muted or only showing the moderator and not the participants in the default mode, which is handy for talks.
Usage Tips
- Press
afor a menu to reduce your camera resolution. - Press
mor the space bar to mute yourself. When muted press the space bar for push-to-talk. - Press
rto raise your hand, i.e. announce that you would like to talk. - Use a headset.
- Rooms are ephemeral and cease to exist once the last person leaves. It is not possible to join a room, prepare some settings, and leave again.