Table of Contents
Using revision control systems
git on a shared grouphome
Using git, it's relatively simple and easy to set up a shared revision control system for a group using a folder which has read and write permissions for everyone who is a member of this group. At the Physics department, we have the grouphome folder which can be used for exactly this purpose.
Creating the shared git repository on the server
First of all, open a terminal and open an SSH connection to login.physik.fu-berlin.de. Then change into your group's grouphome directory using the cd command, e.g. cd /net/grouphome/ag-test. Then issue the command git init –bare –shared=true myrepo.git to create an empty git repository with the name myrepo:
This is already all that is needed to set up the shared git repository. Creating the git repository in your group's grouphome folder makes sure that the git repository is created with the proper permissions for everyone in your group to check out files/changes and commit them.
Clone a local working copy of the repository on the server
To use the newly created git repository, navigate back into your home directory using the cd command without any arguments. Then enter git clone ssh://grouphome.physik.fu-berlin.de/srv/grouphome/fbedv/myrepo.git to create a working copy of the myrepo.git repository in your home folder. Please note that by cloning the git repository from the grouphome folder, the .git suffix is automatically removed from the repository's folder name (the customary suffix .git is used to distinguish a bare repository from a local, working copy).
After cloning the myrepo repository, change into its folder and verify it's empty using the ls command:
Making changes and committing them to the local working copy
Now we're going to demonstrate how to add a new file to the repository. For simplicity's sake, we just create a simple text file using the echo command. You may, of course, use any text editor or any other program to create files to be added to the git repository.
After creating a new file into the git repository folder, git is able to see that there a new, untracked files. This can be seen using git status (which is always very handy when checking the current status of the local working copy of the git repository).
Add the new file to the git repository by entering git add test.txt. You can issue git status again to verify the new file has now been staged for commit:
To commit the changes, type git commit -m "Commit Message" where "Commit Message" is an arbitrary text used to describe this particular commit. You may also edit the commit message in your editor of choice (set by the environment variable $EDITOR) by just typing git commit.
Note: Unlike cvs or svn, anything that has been committed is not automatically pushed to the remote repository on the server (in this case, the repository in the grouphome folder). To push the changes to the remote repository, we use the command git push, see below.
Before we push the changes to the remote repository, we can verify the changes using the command git log (here piped to the command cat to avoid displaying the git log in the less pager).
Push the local changes to the repository on the server
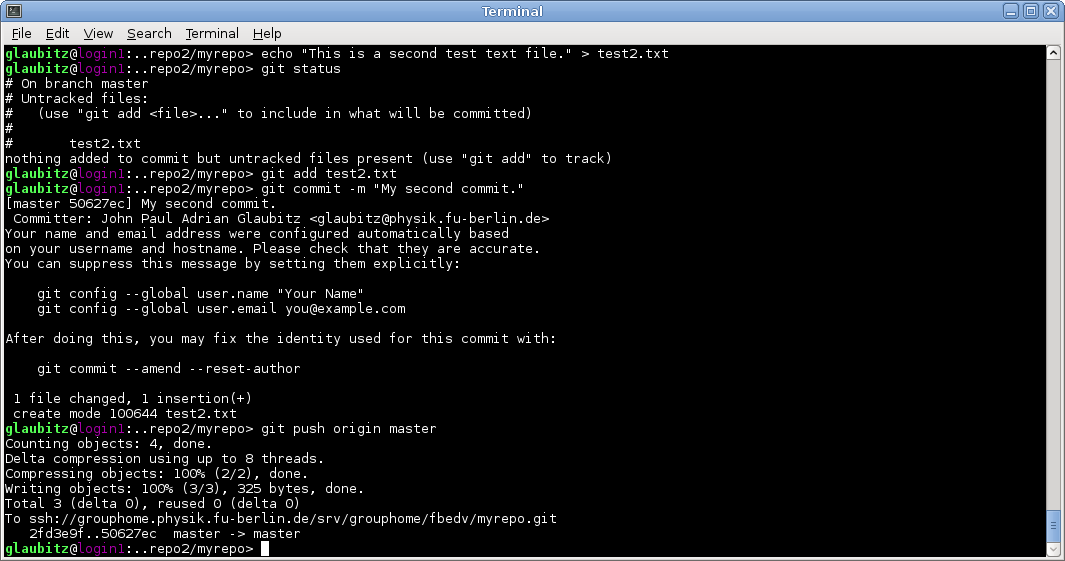
To push the changes to the server, we use git push. The push command requires information about the remote repository to be used (called origin by default) as well as the development branch to be pushed to the server (master by default if you didn't specify any additional branches).
git remote lists the remote repositories that are currently available (additional can be defined using git remote add) while git branch -a lists the available branches.
Thus, in this case we need to run git push origin master to push our changes to the repository in the grouphome folder:
This is all that's needed to set up a remote git repository, clone a local working copy as well as push changes to the server. The rest of the description now describes how a second user can clone the repository, make their changes, push them and have the first user copy those new changes to their local repository using the git pull commmand.
Collaborating with other users
This section shall demonstrate how a second user would clone the repository from the server, make changes, commit them and eventually push them back to the repository.
To simulate this scenario in this example, we just create a new empty folder called repo2 where we clone a second local working copy into. This is basically the same as if a second user clones the remote repository into their home directory.
To clone the remote repository we just created, it's best practice to specify the remote repository using the full hostname of the server (servername + domain) as well as the full path on the server (as opposed to using /net/grouphome/ag-test/myrepo.git). This way, git will automatically set the proper remote entry which allows future pushes to the repository to be more convenient.
After cloning, we change into the myrepo directory of the repository and verify the commit history using the already known git log command:
Now, we just create a second file as described in the section above. Then use git status to verify, git add to add and git commit to commit our changes. Then we issue git push origin master to eventually push the changes to the server.
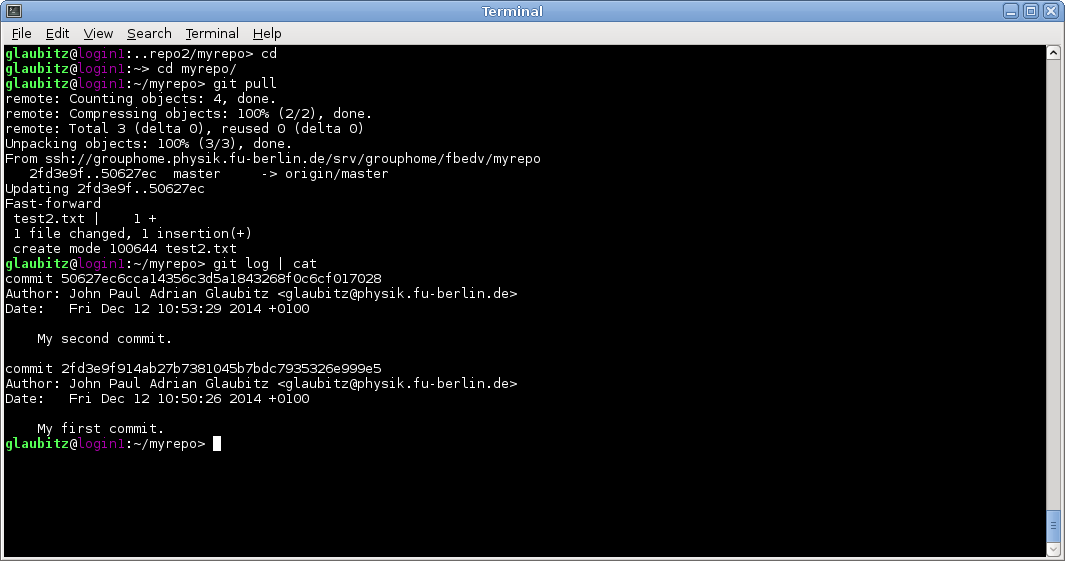
Changing back to the first user who just needs to call git pull to synchronize (pull in git speak) the new changes and check the commit history with git log.
Short summary of useful git commands
git init <repository>- create a git repository in the current folder with the name repository (add–barefor server repositories)git clone <URL to git repository>- clone a local working copy of a remote repositorygit pull- check the remote repository for new changes and retrieve themgit add <file>- add a new file to the git repository (requires commit)git status- view current status of the repository including files which are untracked and files to be committedgit commit -m <commit message>- commit all staged changesgit stash- revert all changes made since the last commit were madegit remote- list and modify remote repositoriesgit branch- list and modify development branchesgit diff commitID1..commitID2- view changes between two commits


